
A lateral ankle sprain. You probably saw the title and thought, “Lateral ankle sprains? They’re hardly an injury crisis that needs addressing.”
How many times has an athlete come to tell you that they rolled their ankle in training, but they’re fine? The athlete’s fear of being told they can’t train kicks in, and they show you how functional they are.
“I can single leg hop on it with no issues…”
“It’s just a little bit sore on the outside but I’ll tape it and I’ll be fine…”
Or, worst of all, the athlete just pretends it never happened and “runs it off,” leaving you in the dark and unable to have any impact on the injury at all.
When we look at the research, lateral ankle sprains (LAS) are one of the most common musculoskeletal injuries in sports and recreational activities [1]. LAS also have the highest re-injury rate of all lower limb musculoskeletal injuries [2]. Individuals who suffer a lateral ankle sprain have double the reinjury risk in the year after the initial injury [3].
If incidence and reinjury rates are so high, it is up to us to find a way to reduce the risks and return our athletes as quickly as possible with a fully functioning ankle. Alternatively, if our athletes try to play through the injury and over-rely on short-term interventions like taping and icing, the risk of reinjury and chronic ankle instability (CAI) increases.
Reinjury of the lateral ankle is just one of the many symptoms that defines CAI (4). Other symptoms include pain, persistent swelling, feelings of instability, the ankle “giving way” and reduced functional capacity.
As practitioners, we need to ensure we are mitigating the risk of long-term impairments, rather than being short-sighted and returning athletes to sport as soon as possible. We need an appropriate testing battery to measure these mechanosensory impairments – dysfunction in the transduction of mechanical stimuli into neural signals – to reduce the risk of chronic ankle instability.

Early intervention is key. The following framework will help guide your testing to identify the mechanosensory deficits that present in the acute stages so we can optimise our athlete’s function in the long term. Additionally, I outline some exercise progressions that may ensure athletes are returning to optimal function while managing pain and discomfort. This approach is more beneficial in the long run for preventing CAI than taking the “conservative” approach and strapping an athlete up to get them through games or training.
Tweet This“Lateral ankle sprains are one of the most common musculoskeletal injuries in sports and recreational activities with the highest re-injury rate of all lower limb musculoskeletal injuries”
@ciangormley
Rehab starts at the pain-free entry point for each component of performance
Like with all good physical performance or rehabilitation programs, we should start with the end in mind. We need to know what the ideal athlete looks like and work backwards from there.
To objectively measure an athlete’s current performance status, practitioners need to outline the testing criteria on Day 1 and explain to the athletes and the rest of the staff the importance of returning limb-symmetry index (LSI) to within 90%. Table 1 outlines the general criteria along the rehab process, with an overarching question to guide and justify each parameter as a KPI for returning to play in a chaotic sport with repeated bouts of high intensity running and reactive agility.
| Criteria | What are we looking for? | Measure |
| Pain | How sore is the ankle? Can we progress our exercises yet? | Pain scale |
| Static / dynamic postural stability | Consistently identified in individuals with chronic ankle instability | BESS SEBT |
| Strength | Are the ankle and associated muscles strong enough to tolerate functional loading? | Straight/bent knee Strength tests MMT eversion strength |
| Strength | What does our slow and fast SSC look like? Do we have the capacity for running / change of direction? | SL CMJ SL drop jump |
| Gait | What does the ankle look like when moving linearly and laterally at a range of speeds? | 2D gait analysis |
Throughout the testing, regularly assess an athlete’s perception of pain within the ankle, from 10 being the worst pain imaginable to 0 being no pain at all. By avoiding pain during rehabilitation, we reduce the impact of pain inhibition on strength development [6].
Our goal post-lateral ankle sprain is to find the pain-free entry point for all exercises. The pain-free entry point is a targeted exercise that is the most challenging – that is, the most effective at exposing the differences between the injured and uninjured sides – the athlete can tolerate without causing pain.
If you find yourself having a conversation with an athlete about how high their pain tolerance is, you’ve missed the point. Pain-free means exactly that: pain-free, no pain, 0/10. It’s not about whether they can tolerate a low level of pain. Our job as practitioners is to have enough exercise variations, progressions and regressions to ensure we find a challenging exercise that targets the desired physical quality with no pain at all.
Bearing this in mind, we can progress the athlete through balance, strength and plyometric work, with the end goal of returning to linear and multidirectional running.
Proprioception / Balance
One of the first things athletes say during the subjective assessment at the clinic is that they feel unstable on their injured side. As a result, my first goal is to identify if there are any impairments in proprioception or balance between injured and non-injured limbs.
A simple screening tool to assess basic foot control and function is a double leg calf raise. Then progress to a single leg calf raise to identify any limitations with foot control and function on the injured side.
Ideally, the athlete has symmetrical plantarflexion and dorsiflexion ROM, which we determine by measuring heel height from the floor for plantarflexion and measuring the knee-to-wall distance for dorsiflexion.
Assessing static and dynamic stability also gives us more information about basic foot control and function. Two tests that let you quanitfy improvements are the Balance Error Scoring System (BESS) for measuring static stability [5] and the Star Excursion Balance Test (SEBT) for measuring dynamic stability [6].
The BESS progresses from double to single leg balance on stable and unstable surfaces. Alternatively, the SEBT offers a nice progression for challenging single leg dynamic stability. Perturbations and visual stimuli during either or both of these tests can also enhance the specificity of the task, which is important when returning athletes to play.
Strength
Along with improving balance and foot control, we want to objectively measure max strength and strength endurance of the calf musculature. At the Sports Surgery Clinic (SSC), we use isokinetic dynamometry equipment as well as force plates to measure athletes’ strength.
To measure straight leg calf strength, we use a prone test at 30 degrees per second. We look at peak force (N) and range-specific force for both inner and outer range strength, for both plantarflexion and dorsiflexion. We then normalize these scores to bodyweight (N/kg). Figure 1 is an example of the output from our IKD testing, where you can see range specific scores for both plantarflexion and dorsiflexion.

We also use a bent knee isometric protocol on our force plates to measure soleus strength, again relative to bodyweight (N/kg); and assess limb symmetry via soleus strength on the force plates. Athletes sit with 90 degrees hip and knee flexion with the foot in 5-10 degrees dorsiflexion. On each side they complete three maximum effort repetitions with a 5-second push, with 30-60 seconds rest between reps. We take the average of the three reps.

For the calf strength endurance test, athletes perform max bodyweight single leg calf raises with a 1-second concentric and 1-second eccentric through full range of motion with the contralateral knee and hip flexed to 90 degrees. We compare strength endurance on both sides alongside max strength to ensure we are targeting both ends of the strength continuum.
The final component of strength that is particularly relevant to a lateral ankle sprain is manually testing eversion strength. Maintaining a solid, inverted foot – particularly in a plantarflexed position – is typically quite difficult for athletes post-lateral ankle sprain and contributes to their feeling of instability. I describe these movements to athletes by telling them the eversion muscles – peroneus longus and brevis – are there to prevent you from rolling your ankle. If you are relying on your lateral ankle ligaments to protect you, it’s too late. Lateral ankle ligaments are the safety net. They should only be used as a last resort – not protect you from every fall.
We use the Oxford Grading Scale to assess eversion strength. As the athlete’s inversion and eversion strength increases, they also typically report notable improvements in their perception of ankle instability.
Tweet This“If you are relying on your lateral ankle ligaments to protect you, it’s too late. Lateral ankle ligaments are the safety net. They should only be used as a last resort – not protect you from every fall”.
@ciangormley
Plyometric ability
One of the most common misconceptions around plyometrics is the idea that they can only be done once the athlete possesses a certain level of strength. This does our athletes a great disservice.
While certain plyometric progressions might be unsuitable in the early stages, we must not neglect ankle stiffness entirely. Coming back to our framework, it is up to us as practitioners to ensure we find our pain-free entry point.
Finding this entry point for plyometrics is probably the most challenging aspect of rehabilitation post-lateral ankle sprain. Making things even harder, plyometric ability is typically most affected post-injury compared to strength and both static and dynamic stability. But by starting our plyometric work early on, we give the athlete a taste of what they lies ahead in their rehab progression, notably running and then change of direction tasks.
| Exercise |
| Double leg pogo |
| Double leg hurdle hop |
| Double leg multidirectional hurdle hop |
| Single leg pogo |
| Single leg pogo FWD/BWD over line |
| Single leg cone hop |
| Single leg hurdle hop |
| Single leg cone hops 2 FWD/1 BWD |
| Alternate leg 45 degree hop and stick |
| Lateral hop and stick |
| Lateral hudle hop |
| Repeated lateral hurdle hop |
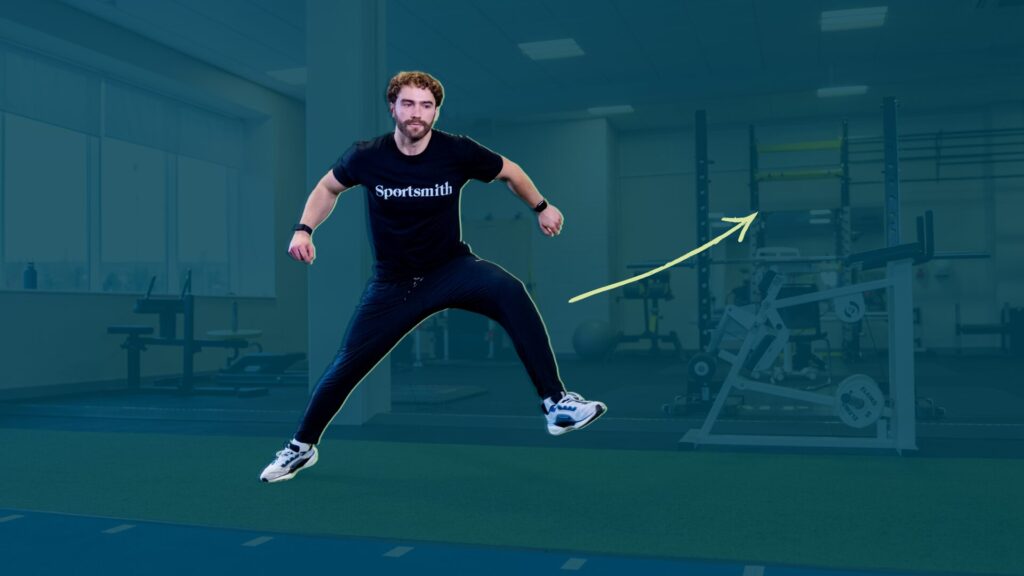
The first progression is double to single leg variations. If one of our key tests is the single leg drop jump with our KPI being >90% LSI, it is important to work on this alongside our other progressions. While it might sound simple to jump straight into double leg pogos, the key is always having a progression and regression available to you to ensure pain-free movement – without holding the athlete back.
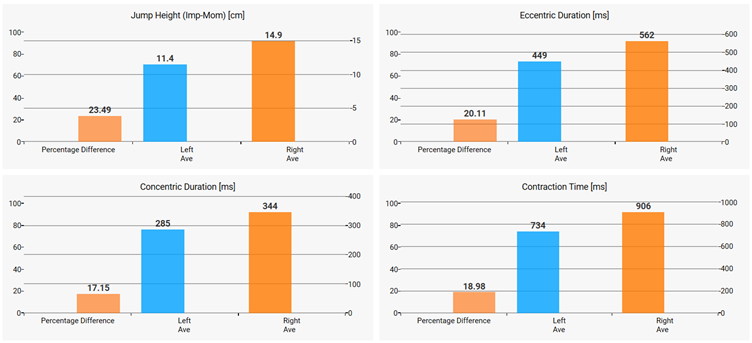
As you can see from the jump heights in our countermovement jumps, there is a clear difference between the injured side (left) and non-injured side (right). The athlete is also guarding the injured side through reduced flexion, as we see in the faster concentric and eccentric times, as well as a faster overall contraction time. While the ultimate goal is to increase jump height and reduce contraction times, athletes may have limited single leg control on the injured side, and therefore only move through a partial range – thus appearing to be faster. This is where our coaches’ eye comes in. We have to subjectively assess our athletes’ jumping strategies.
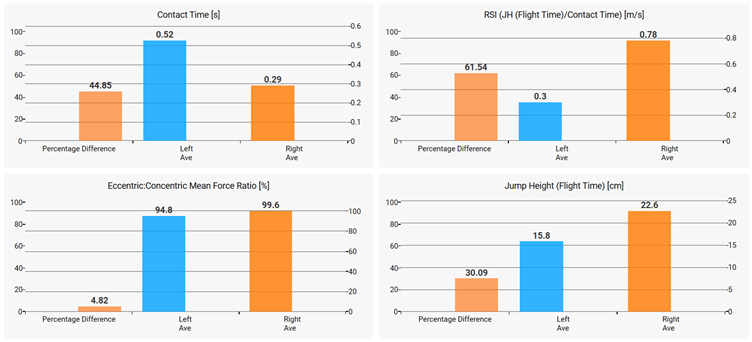
Similarly, when we look at single leg drop jumps, we can see the injured side spends longer on the ground, doesn’t jump as high and has a reduced Reactive Strength Index (jump height divided by contact time).
When we evaluate ways to address the deficits in both our slow and fast stretch-shortening cycle assessments, we must consider how we progress our plyometrics. Table 2 shows the overall trend of progressing exercises from double to single leg. Another of the most basic plyometric regressions is from slow to fast stretch-shortening cycle plyometrics. Our final progression is to work from linear to lateral, which is where athletes post-lateral ankle sprain typically are most uncomfortable as they are exposed to environments similar where they were originally injured.
Pain-free trumps timelines when progressing or regressing
Athletes employ a variety of coping strategies for complex or reactive movements to make them “pain-free.” We have to identify these right alongside the appropriate progressions and regressions!
As practitioners, we must be very clear on our progression criteria and give good reasoning for why we are or are not progressing an athlete to the next stage. Just because an athlete finds a way to do a lateral shuffle pain-free but struggles to consistently do a pain-free single leg lateral hop does not mean we should skip to the next stage and hope for the best. We must qualitatively assess each athlete’s ability to maintain the ankle joint integrity in multiple planes.
If we are struggling to regress a complex movement, we are setting ourselves up for failure by returning to sport-specific movements prematurely. Naturally, this is a greater risk in competitve sports, where returning to performance is time sensitive. Recreational athletes, on the other hand, typically have more relaxed schedules for their rehabilitation. Speed bumps are less of an issue for them. This further reinforces the need for clear technical models within each component of our framework.
The progression criteria for deciding if and when athletes are ready to return to running is dictated by both sagittal and frontal plane plyometrics.
Integrating running into the lateral ankle sprain rehab plan
The final piece of the puzzle is putting our foot control, strength and plyometrics work together into progressively more challenging and chaotic environments as the athlete returns to running.
Our entry criteria for returning to linear running is the athlete completing a pain-free single leg hop.
Linear running
Before linear running, athletes need to complete consecutive single leg hops, with fast contact times and appropriate form, and ensure these do not result in pain or swelling of the injured ankle. I typically use three sets of 10 reps. This is the same criteria for change of direction running, except this time the plyometrics must be in the sagittal plane. Athletes have to complete consecutive reps of lateral hops – usually three sets of five reps – on the injured side with no pain or swelling.
A great way to assess linear running mechanics is using 2-D slow-motion video analysis, which we can all do on most phones and tablets these days. Our focus points should be around the hips, knees and ankles. While an athlete might have sufficient strength and power in these areas, it is imperative that we assess their rate of force development in the involved areas when they are running.
Once we have established appropriate running mechanics, we must then build towards the training and competition demands. If you have GPS units and can quantify a typical game load, this can be your end goal. Unfortunately, however, this athlete did not come with GPS data, so I had to find some ways to progressively overload them without it.
Table 3 shows a very simple loading progression to progress from low intensity to high intensity linear running over several sessions, with a goal of accumulating more high-speed running volume for the athlete.
| Distance (m) | Target (s) | Rest (s) | Running speed (m/s) | Sets | Reps | Total volume |
| 82.5 | 25 | 35 | 3.3 | 3 | 6 | 1485 |
| 82.5 | 22 | 28 | 3.7 | 3 | 8 | 1980 |
| 82.5 | 18 | 22 | 4.6 | 3 | 8 | 1980 |
| 82.5 | 15 | 15 | 5.5 | 3 | 10 | 2475 |
In addition to exposing the athlete to repeated submaximal running speeds, we must also ensure we are progressing the return to sprinting. We don’t want our athlete to drop off on their chronic speed load and leave themselves vulnerable to hamstring injuries upon return! Introducing sprinting to rehab is typically easier to achieve after a lateral ankle sprain once the athlete is familiar with low intensity linear running.
The goal is to have athletes run at incrementally faster speeds over the course of their rehabilitation. Table 4 has an example of different max sprint speeds expressed as the time to complete a standard distance, for situations where you can’t rely on GPS output.
| Speed (m/s) | Time (s) | Distance (m) |
| 6.4 | 7 | 45 |
| 7.1 | 7 | 50 |
| 7.5 | 6 | 45 |
| 8.3 | 6 | 50 |
| 9.0 | 5 | 45 |
| 10.0 | 5 | 50 |
Another speed progression we can bring in that allows us to build into our change of direction work is arc running. We want the athlete to maintain these linear sprint speeds through shallow arcs before building into deeper arcs as they feel more confident. These runs can act as a bridge between linear and more difficult change of direction tasks.
Multidirectional running
As athletes build confidence in linear running, it is crucial that we appropriately assess and challenge change of direction mechanics and drills before we can confidently return them to sport. While the lateral plyometric work solidifies the foundational movements, the goal should always be to further increase the volume, intensity and reactivity of the drills to mimic the demands of the sport.
Multidirectional running post-lateral ankle sprain is usually the element with the biggest mental barrier for athletes because it replicates a lot of the contexts that led to the injury in the first place. The key is to start slow and build confidence by focusing on technique, remembering to always check that the exercises remain pain-free.
Starting with planned change of direction movements can break down the mental barriers an athlete might put around themselves and their ankle in compromised positions. Table 5 has some progressions to progress both 45-degree and 180-degree cuts, from planned to unplanned.
| 45 Degree Cut Progression |
| Lateral shuffle to stick |
| Lateral shuffle to push off |
| Box drill 1 – Accel – Lateral shuffle – Backpedal – Lateral shuffle |
| Box drill 2 – 45 Degree shuffles |
| Acceleration to 45 degree planned cut |
| Acceleration to 45 degree unplanned cut |
| 180 Degree Cut Progression |
| Shuffle into lateral acceleration |
| Shuffle to push off to lateral acceleration |
| 180 Degree turn with pause |
| 180 Degree turn |
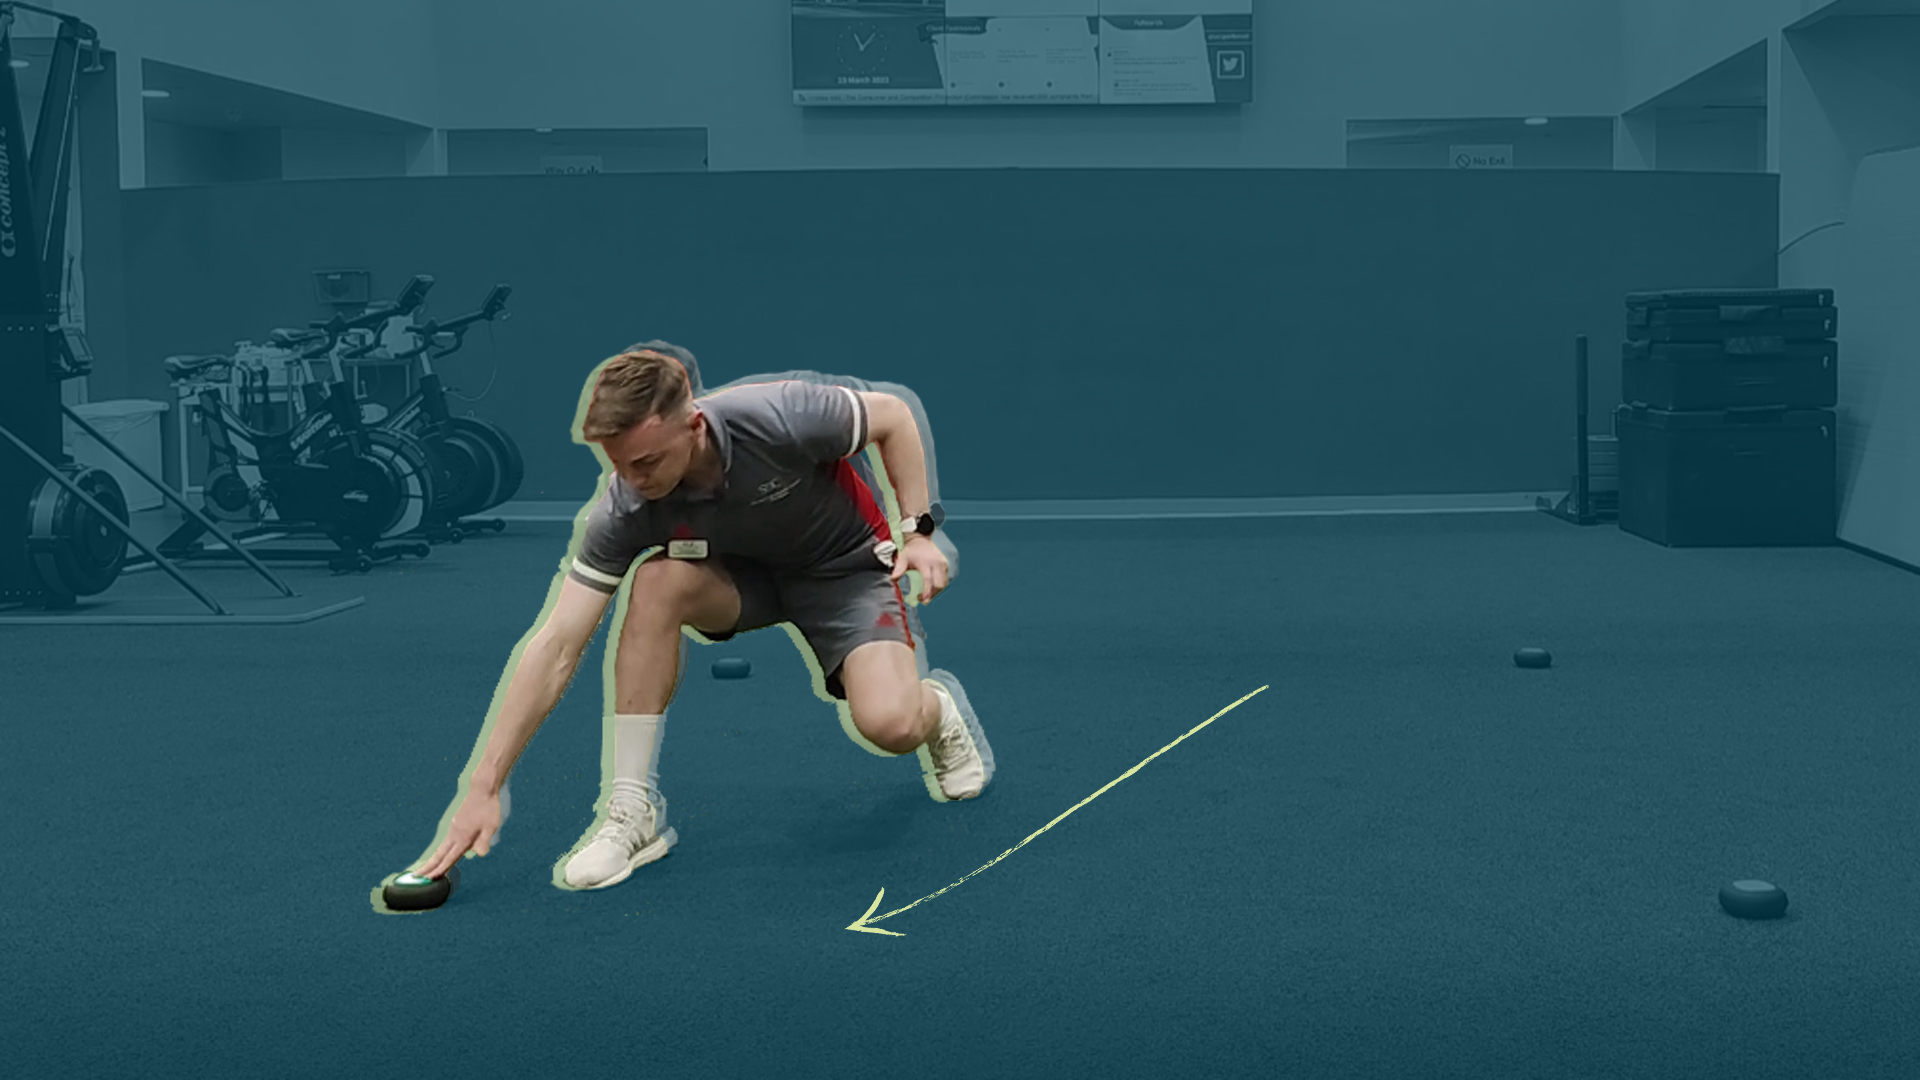
By beginning with simple drills like lateral shuffle to stick, we can assess the athlete’s ability to push off and brake on the injured side. Our goal here is to maintain a low centre of mass and use short, choppy steps to avoid long, overextended lunging movements. By progressing this to a lateral shuffle to push off, we begin to blend our plyometric work with our change of direction work.
Once we begin to expose the athlete to planned change of direction tasks, we must then assess their ability to maintain these mechanics in the presence of reactivity and fatigue in reactive agility tasks. This is where the real challenges present themselves.
There is a difference between being capable and competent. The former suggests that an athlete can complete the task. The latter implies that they complete it well. We must outline our technical model for change of direction work, looking at deceleration and re-acceleration ability and how the trunk, hips, knees and ankles are coordinated in these positions.
Once the athlete achieves base competency, we then start to combine movements – accelerations, decelerations, shuffles at various angles – and layer on complexity through reactivity and challenging environments. The video above shows how to progress a simple lateral shuffle drill from planned change of direction to reactive agility, becoming even more sports specific as we progress.
Then the final and most important piece of the puzzle. Our job is making sure that the first time the injured ankle is in a compromised position, under physical and psychological stress, in our controlled setting – not after the athlete has returned to playing.
Prepare the athlete for a sustained return to play
As performance practitioners, we need a Ph.D. in our sport. While I have tried to keep this framework for rehabilitation post-lateral ankle sprain somewhat generic, the parting message is to reframe it through the lens of your own sport.
Whether you are dealing with a badminton player, a basketball player or a rugby player, the same principles apply.
Utilise a framework to identify your athlete’s mechanosensory deficits early on, focusing on balance, strength, plyometrics and, finally, running mechanics. Within each of these components, lay out your testing criteria and then select your exercise progressions with the end goal in mind. Finally, while the initial injury might not seem detrimental to performance, four weeks dealing with a lateral ankle sprain is better than 12 weeks dealing with chronic ankle instability.
Prevention is better than a cure. Early intervention is key.