
As strength & conditioning coaches, we can have a positive impact by implementing strategies to reduce the number of injuries our athletes and teams experience throughout a season. By prioritising prevention, organisations can alleviate the financial burden associated with injuries while significantly improving the chances of attaining sporting success [20,21].
Injury prevention should not be discussed separately from performance enhancement. They are interconnected and integral to each other.
The interplay between the two comes to the fore when communicating with athletes to achieve the greatest outcomes. If an athlete presents with an extensive injury history, coaches can better reach them through the language of prevention. However, selling prevention to an already robust athlete with little to no injury history, who has never completed such a program, isn’t the best approach. Framing the conversation in terms of performance enhancement will be more effective for reaching the elusive goal for many S&C coaches: athlete compliance.
This article will present my perspectives and outline some aspects of my process for trying to mitigate injury risk. Figure 1 illustrates the key areas to be considered, although any infographic belies the complex nature of this topic. The primary focus of this article will be movement screening and movement quality training, and how I employ these elements within my prevention toolbox.

Tweet ThisInjury prevention should not be discussed separately from performance enhancement. They are interconnected and integral to each other
@jermainePT
Obtaining objective data through movement screens
Movement screening systematically assesses an individual’s movement patterns and capabilities to identify limitations and compensatory movements that may impact injury risk, function or performance.
The fundamental task of performance practitioners is selecting assessments that are easy to administer, cost and time effective, help guide better decisions, and have evidence supporting their inclusion. I incorporate a few screening and physical performance tests as part of the overall profiling process; they’re fantastic for determining force generation and expression capabilities at higher loads and velocities.
To spotlight just one for the purposes of an article, let’s examine the single leg squat (SLS).
Tweet ThisThe fundamental task of performance practitioners is selecting assessments that are easy to administer, cost and time effective, help guide better decisions, and have evidence supporting their inclusion
@jermainePT
Deploying the single leg squat as a movement screen
Incorporating the SLS into my assessment provides valuable insights into an individual’s physical and technical capabilities when performing a fundamental task. Specific compensations observed during the SLS are likely to be exhibited in more dynamic tasks such as jogging and cutting [23,24], and have associations with hip issues, knee pain and non-contact ACL injuries [1–6].
The simplicity of implementation, the associated risks, and the consistent positive results I have obtained solidify the SLS’s role in my profiling process.
The precondition for any reliable, objective and precise evaluation is standardizing the process. Table 1 breaks down each element of the SLS testing protocol that we enforce with every assessment, ensuring that we can compare results across athletes and across time.
| Instruction | Rationale |
| Remove footwear | Eliminates potentially confounding effect of different footwear on different testing days, increases instability and reduces any assistance for reduced ankle mobility. |
| Conduct screen in shorts | Easier to apply markers for quantitative assessment of knee valgus angle between the anterior superior iliac spine (ASIS), patella, and the centre of the malleolus. |
| Foot position at 12 o’clock | External rotation of the foot is likely to have an unwanted effect on knee joint mechanics. |
| Non-stance foot positioned parallel to stance foot | Stretching the non-stance limb (as in a pistol squat) will aid the technique. SLS has a major focus on hip alignment. Thus, keeping the foot parallel will assist in determining if a true hip hike / drop occurs (assuming hips remain level before movement begins). |
| Hands on hips | Arms stretched out in front allow the athlete to manipulate their centre of mass, helping them “achieve” greater depth. Requiring hands on the hips is a standardization measure adapted from jump testing protocols. |
| Squat as deep as possible for 5 seconds | Encourages athletes to demonstrate their strength in this pattern. Some compensations are not visible at shallow depths. Completing the test under time constraints reduces the effect of velocity on knee angles. |
| Complete 3 repetitions | Allows enough time for the athlete to get a good feel for the exercise and not be judged on one attempt. An athlete can “self regulate,” which also allows the practitioner enough time to determine if capacity is an issue. |
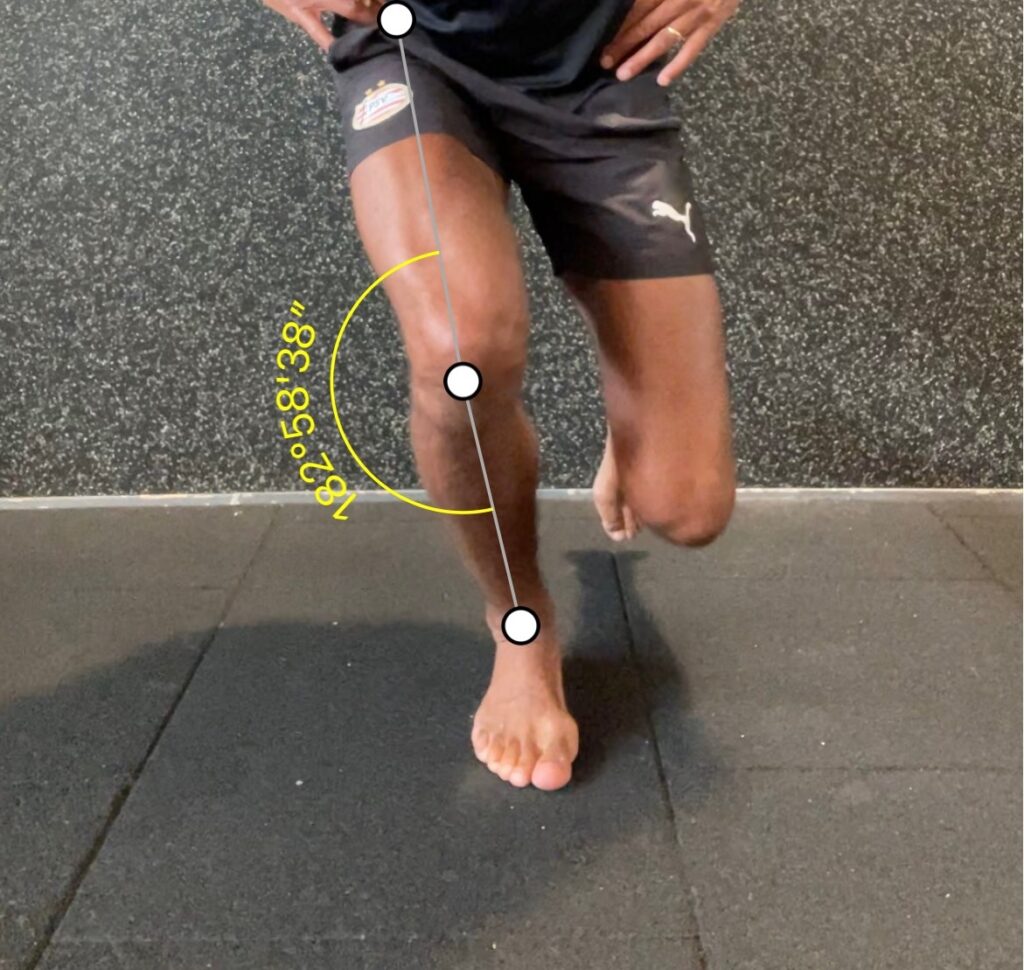
With these measures in place and with just an iPhone, we can capture and calculate knee valgus angle (Figure 2). The regularity and simplicity of this process enables me to dive deeper into the analysis, assess program efficacy and provide valuable feedback opportunities.

Tweet ThisThe precondition for any reliable, objective and precise evaluation is standardizing the process
@jermainePT
Linking observed deficiencies to recommended correctives
Players need to be able to see the problem before we attempt to provide the solution. If an athlete doesn’t understand what needs to improve and why, committing to the intervention will be challenge.
I take a top-down approach while screening, focusing on four key areas: the upper body, hip, knee and foot. I developed a visual referencing tool to facilitate a better understanding of the movement compensations associated with these areas. Figure 3 illustrates my approach and the interventions I would apply based on the screening results.

The SLS can elicit and allow the practitioner to observe an array of movement compensations. Understanding the interplay between compensation and probable causes is integral for effective program development.
However, it’s important to note that movement compensations may not always present themselves under low load, low velocity conditions. For those athletes that do demonstrate competency in the SLS, assessing if they are capable of completing a single leg landing from a 30 cm box with good technical proficiency would be my next step, because the increases in specificity will challenge the hip stabilisers and frontal plane kinematics further.
Landings are also a risk factor for many unilateral sports, so this assessment can help determine the effects of velocity on movement strategies. It can also indicate if specific interventions are warranted, and provide insight into where to place athletes on the plyometric continuum.
Tweet ThisFor athletes that demonstrate competency in the single leg squat, assessing if they are capable of completing a single leg landing from a 30 cm box with good technical proficiency would be my next step
@jermainePT
Movement quality training (MQT)
I organize my training interventions into five pillars – inspired by the NASM framework [8,9] – each serving a specific purpose towards the development of overall athleticism. My version integrates the concepts of inhibition and lengthening work into a single preparation pillar. I also introduced a mechanics phase; and gave the integration pillar more specificity and context, in order to establish a stronger relationship and training transfer from the gym to the athlete’s sport.

Let’s bring to life the training recommendations outlined in Figure 3 for an athlete who presents with knee valgus. The following exercises are prescribed for an athlete at the beginning of their intervention. Depending on execution, we can regress / progress the exercises accordingly, while ensuring they always fit within the themes of the pillars.

Preparation
| Preparation | ||||
| Exercise | Sets | Reps | Load | Time |
| Adductor rock back | 2 | 10 | ||
| Hamstring stretch | 2 | 10 | ||
| 90/90 INT rotation lift | 2 | 10 | BW | 1″ hold @ top |
The adductors and hamstrings are probably the overactive muscles contributing to this athlete’s knee valgus. Valgus is often the result of limited hip internal rotation, and individuals therefore try to find the necessary internal rotation via compensatory mechanisms. This can be a forgotten yet crucial area to address because if internal rotation is limited the compensations can transfer the additional load to the knee, increasing torque and predisposing an individual to injury during sport specific movements [18].
The adductor complex and hamstring stretches in this phase can provide acute adaptations in tissue extensibility to create a better foundation for improved posture, movement and positions that will proceed later in the program [14].
Activation
| Activation | ||||
| Exercise | Sets | Reps | Load | Time |
| Side plank banded hip abduction | 2 | 12 | Mini band | |
| Run specific knee iso push | 2 | 2 | / | 30″ |
The weakness of the hip abductors reduces hip stability during single leg tasks, resulting in difficulty maintaining a neutral hip and knee position [15]. Within this pillar, the goal is to activate and strengthen the hip abductors while also enhancing motor control.
The gluteus medius is the strongest hip abductor, [15] and EMG studies validate resisted side lying hip abduction for effectively activating this muscle [16]. Completing this exercise in isolation would be sufficient. But if player has the technical proficiency to perform this exercise while maintaining a side plank, then this is the variation or progression I choose. Incorporating a side plank can enhance trunk strength and stability, which in turn can provide support for maintaining optimal frontal plane kinematics [17].
By stimulating the external rotators early in the program, we bring these muscles into a state of readiness, which sets the stage for subsequent exercises.
I recently began integrating Alex Natera’s run specific isometric work into my valgus programs in order to leverage the benefits of prior activation exercises. These enhance motor control and increase the rate of muscle activation at specific joint angles, while simultaneously targeting pelvic strength and core stability.
The run specific isometrics use joint angles close to those that a player experiences at mid-stance during maximum velocity running, or deeper angles just above where the compensation becomes exaggerated. We base the decision about which angles to target upon the primary focus of the daily training: accelerations, high speed running, change of direction / deceleration, etc.
During the set, I monitor fatigue and any changes in task strategy. This is the reference point for progressions / regressions. For instance, if I see a change in strategy after 20 seconds of an isometric, I would then program 3-4 cluster sets of 10-15 seconds with adequate rest intervals to ensure the athlete maintains the quality of the repetitions.
Mechanics
| Mechanics | |||
| Exercise | Sets | Reps | Load |
| Single leg snap downs | 2 | 5 e/s | BW |
| Lateral push to base | 2 | 5 e/s | BW |
Valgus is a common element of non-contact ACL injuries, and it’s a position that occurs frequently during directional changes and landings [18]. This stage of the process is ideal for letting athletes learn skills in individual parts, before gradually integrating the components into the whole later in the program.
Drills that focus on multidirectional force “absorption,” developing triple flexed positions and lateral force production will be important to ensure optimal load distribution throughout the kinetic chain.
Resistance
| Resistance | |||
| Exercise | Sets | Reps | Load |
| SL box squat | 2 | 5 | 4-5 RIR |
| Split stance RDL (IR bias) | 2 | 5 | 4-5 RIR |
The resistance pillar focuses on dynamic resistance exercises to improve strength and neuromuscular coordination.
With the SLS, I gradually increase the depth of the squat as the athlete’s strength, competence and control improves. This challenges pelvic and hip stability, strength and coordination to a greater degree.
Once competent at specific depths, progressively overloading the movement pattern further strengthens the hip external rotators and quads.
Considering their supportive role in movement, it is important to not neglect the hamstrings. A single leg Romanian dead lift or its variations would be effective here. However, for athletes with reduced hip internal rotation, I’d recommend using a split stance RDL with a contralateral twist or a split stance RDL with a foam roll wall press in order to bias hip internal rotation throughout the movement. “Unlocking” the hips can be an integral piece of the puzzle when addressing knee valgus.
Integration
| Integration | |||
| Exercise | Sets | Reps | Load |
| Constraint based lateral shuffle | 3 | 3 | BW |
The primary objective of the final pillar is to enhance training transfer by incorporating drills that bridge the gap between gym exercises and sports performance. While strengthening exercises are essential, they may not be sufficient to correct abnormal movement patterns during dynamic sports activities [19].
During this phase, the goal is to incorporate higher levels of dynamic activity on the foundations we established in the mechanics pillar. This approach aims to enhance an individual’s ability to tolerate high risk postures and positions more effectively.
A constraint based lateral shuffle is my standard entry point for this phase. The primary objective of this drill is to emphasise the connection between improved technical positions and the increased ground reaction forces encountered during the weight acceptance phase of the plant leg.
By honing this skill with increased specificity, athletes can optimise cutting angles, transitional movements, and reduce the cost of the task on the system.
Personalize performance and prevention programs
The most effective injury prevention program is the one the athlete actually does. There is never a single “best” exercise for any pillar of this framework. Exercise selection, periodization and progression / regression are all up to the strength & conditioning practitioner to develop the best program for the athlete in front of them.
Whatever the details, completing a program like this 2-3 times per week as part of athletes’ “pre-activation” routine can help improve the modifiable biomechanical and neuromuscular deficits that contribute to knee valgus or any other indicator that you screen for, simultaneously reducing injury risk and enhancing performance.
Tweet ThisWhen implementing run-specific isometrics, we base the decision about which angles to target upon the primary focus of the daily training: accelerations, high speed running, change of direction / deceleration, etc
@jermainePT